Espresso and Ricotta Cheesecake

Espresso and Ricotta Tart

I did a baking workshop for Moirs on the weekend and had to do this tart for them. I call it a cheesecake because it is a baked cheesecake in a tart dish! It’s absolutely amazing, especially if you like a coffee flavour. The texture is beautiful and the ricotta adds an interesting dimension. The trick with this one is that your ricotta MUST be soft. I bought a brand that was hard and it just didn’t work! I then tried it with the Woolworths Ricotta that you can buy in the tub and it worked beautifully! The coffee and chocolate crust is also pretty much to die for so don’t substitute the biscuits if you can help it cause they really do make this dish special!

Crust

1 packet Moir’s Coffee Dreams biscuits

30g butter or margarine, melted

20cm Hulamin pie dish

Filling

500g ricotta cheese

175g cream cheese

2 extra-large eggs

125g brown sugar

30ml flour

70ml freshly brewed espresso coffee

5ml Moir’s Vanilla Essence

  • Preheat oven to 170°C.
  • Crumble the biscuits and mix with melted butter.
  • Spread evenly in a tart dish and along the sides.
  • Beat together the ricotta, cream cheese, eggs, brown sugar and flour until smooth.
  • Add the cooled espresso and vanilla essence and mix well.
  • Spread the mixture evenly on the crust.
  • Bake until light brown, for about 40 minutes.

Photo and Recipe by Moirs

Chocolate, Coffee and Nutella Brownies

Chocolate Coffee and Nutella Brownies

I did a baking workshop this past weekend and had to find recipes that incorporated coffee into baking. I did some research and played around with a few recipes and then came up with these guys. The coffee makes these brownies decadently rich and adds an amazing flavour that makes you go back for more! (yes, its a problem….) The Nutella on the top gives a gorgeous nutty twist but you could use a normal chocolate ganache if you don’t like Nutella (Do those people actually exist??)

175 g unsalted butter, softened

1/2 cup good quality dark chocolate

3 eggs

1/4 cup brewed coffee

1 cup all-purpose flour

1/2 teaspoon baking powder

1/4 cup cocoa powder

¼ tsp salt

1 tsp Vanilla Essence or extract

1 cup caster sugar

1 cup Nutella

  • Preheat the oven to 180 C
  • Line a square baking tin with baking paper, with an extra 1cm on the sides.
  • Melt the butter and chocolate together over a pan of simmering water. Stir until smooth and combined; leave to cool for 5 minutes
  • Meanwhile, sift the flour, salt, baking powder and cocoa powder together.
  • Add the coffee to the chocolate mixture and mix.
  • Whisk the eggs and then add a little bit of the chocolate mixture to the eggs. Whisk and then add the rest of the chocolate mixture and whisk again.
  • Add the vanilla essence and mix. Add the flour mixture and sugar; stir well to combine
  • Pour the batter into prepared pan and bake for around 20 to 25 minutes. What you are looking for is a thin crust on top and if you put pressure on it, it will crack and be mushy underneath! Your brain will tell you that they are not ready, but you want them to be gooey so that when they chill in the fridge they will have that dense, soft and squidgy brownie consistency!
  • Once the brownies have cooled a little bit – but still a bit warm you can spread the Nutella over the top.  Drop the Nutella in blobs around the surface, allow the heat of the brownies to melt the Nutella a little which will make it easier to spread over the delicate surface.
  • When the brownies are at room temperature, refridgerate for a few hours and then cut into squares.

Makes 12

Red Velvet Flan

Red velvet flan

This is an incredible take on the red velvet classic. It has a beautiful dense, moist base, filled with a cheese cake filling that compliments the cake so well. I topped mine with strawberries only, but this recipe from Moirs suggests chopped meringues as well. It’s something different and quite special! A great option to make for a dessert as you can do it the day before!

For the Cake:

312 ml (180 g) cake fl our

187 ml (150 g) sugar

5 ml Moir’s Bicarbonate of Soda

10 ml cocoa powder

2.5 ml salt

125 ml buttermilk

1 extra large egg

165 ml oil

5 ml vinegar

15 ml Moir’s Red Food Colouring

2.5 ml Moir’s Vanilla Essence

Filling: 

230 g cream cheese

1 x 397 g can condensed milk

80 ml fresh lemon juice

5 ml Moir’s Vanilla Essence

4 meringues, chopped

250 g strawberries, hulled and halved

Icing sugar for dusting

Cake:

1. Sift the dry ingredients together. Do this TWICE.

2. Beat the buttermilk, egg, oil, vinegar, colouring and essence together.

3. Add to the dry ingredients and mix until just combined. Do not over-mix.

4. Pour into a greased 25 cm flan tin. (I used 2 smaller disposable tart tins)

5. Bake in a preheated oven at 180°C for 30 -35 minutes or until a skewer inserted comes out clean.

6. Cool in the pan. Once cooled, press the centre down a bit and using your fingers around the edges shape the cake into a ‘pie crust’ shape to make space for the filling.

Filling:

7. Beat cream cheese and condensed milk together until smooth.

8. Add the lemon juice and the vanilla and beat for 2 minutes.

9. Pour into the prepared flan casing.

10. Refrigerate for about 3 hours or until set.

11. Sprinkle the crushed meringues on top and press gently into filling.

12. Arrange strawberries on top and dust with icing sugar just before serving.

Recipe by Moirs

Photo 2013-08-20 10 40 23 PM

Decadent Chocolate Mousse

ChocolateMousse

I have searched high and low for a decent chocolate mousse recipe. Some of them I found had great ingredients, but a terrible method. Some had a great method but the ingredients lacked something. Again, I did what I do best and scrambled up a few recipes to come up with this one. It works beautifully and tastes SO good! You do have to let it set overnight though, which I think is great for dinner parties as you can get a whole course sorted the day before. Don’t take shortcuts, this one needs that time in the fridge! You can decorate with some icing sugar and berries or strawberries. This one is a winner!!


200g dark chocolate, chopped

20g butter

3 eggs, separated

1 tablespoon caster sugar

1 cup (250ml) pouring cream

120g raspberries


  • Place the chocolate and butter in a small glass bowl that fits snugly on top of a small saucepan with boiling water in the saucepan, one third full. Over a low heat and stir until melted and smooth.
  • Meanwhile whip the cream until soft peaks form and then place in the fridge to keep cool.
  • Put the egg yolks into a bowl and give them a light whisk with the castor sugar. Once the chocolate is melted, add a little to the egg yolks to temper the yolks and then mix. Then add the rest of the chocolate. Pour everything into the same bowl that you melted the chocolate in and then return the bowl to the bain-marie sauce pan and stir continuously over the boiling water for about a minute or 2 until slightly thickened. Set aside to cool.
  • Whisk the egg whites until stiff peaks form.
  • Fold through the chocolate mixture and the whipped the cream.
  • Spoon into serving glasses and refrigerate overnight until set.
  • Top with the raspberries to serve.

Serves 4


Vanilla Bean Cupcakes with White Chocolate and Cream Cheese Icing

Vanilla Bean Cupcakes with White Chocolate and Cream Cheese Icing

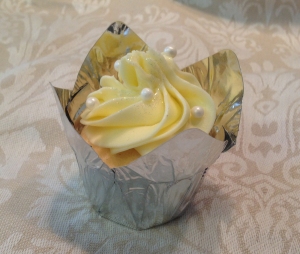
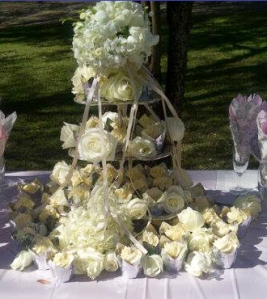
I made these cupcakes for a family wedding recently.  Because it was a special wedding – I really wanted to make them a bit special. I love the red velvet cupcake icing so I wanted to use that with a bit of a twist to fancy it up a bit! So I did some research and came across a few recipes and merged them all together and came up with these beauties!  The white chocolate really did add that something decadent (if you can get more decadent than cream cheese icing!) – they were a hit and my first official wedding baking experience may have left me with a few grey hairs, but they were delicious and the beautiful bride and groom were happy! PHEW!

For the Vanilla Bean Cupcakes:

2 ¼  cups cake flour

1 Tbsp baking powder

½ tsp salt

1 ¼  cups full cream milk (room temperature)

4 large egg whites (room temperature)

120g unsalted butter (room temperature)

1 ½  cups sugar

Seeds scraped from one vanilla bean

2 tsp pure vanilla extract

For the White Chocolate and Cream Cheese Icing:

175g white chocolate, chopped

250g cream cheese, softened

¼ cup (50ml) butter softened

½ tsp vanilla extract

2 cups (500ml) icing sugar

For the Cupcakes:

  • Center a rack in the oven and preheat to 180 C.
  • In a large bowl, sift together the flour, baking powder and salt.
  • In a medium bowl, whisk together the milk and egg whites.
  • In the bowl of a stand mixer fitted with the paddle attachment, or with a hand mixer, beat the butter, sugar and vanilla bean seeds at medium speed for 3 minutes, or until the butter and sugar are very light.
  • Add in the vanilla extract and one third of the flour mixture, still beating on medium speed. Beat in half of the milk-egg mixture, then beat in half of the remaining dry ingredients until well incorporated.
  • Add the rest of the milk and eggs, beating until the batter fully incorporated and smooth, then add the last of the dry ingredients.
  • Once ingredients are thoroughly incorporated, give the batter a good 2-minute beating to ensure that it is thoroughly mixed and well aerated.
  • Fill about 18 free-standing muffin cases with about 2 heaped tablespoons of the batter.
  • Place the muffin cases onto a baking tray and bake for 18-24 minutes, or until a toothpick inserted into the centers come out clean. Cool on wire rack

For the icing:

  • Place the white chocolate in a glass bowl that fits snuggly on a small saucepan filled with a little bit of water (don’t let the glass bowl touch the water) and bring the water to a simmer and the chocolate will slowly melt. Stir occasionally until completely melted. Take off the heat and saucepan and let it stand and cool for a few minutes. Stirring occasionally. Don’t let it stand too long and start setting! It must be luke warm.
  • In a clean mixing bowl, beat the butter and the cream cheese together and then pour in the chocolate and vanilla and combine everything together.
  • Slowly add the icing sugar and beat well.
  • Place the icing into a piping bag and let it cool in the fridge for about 2 – 3 minutes.
  • Ice and decorate as desired!

This was the final result 🙂

Wedding cupcakes